Posts Tagged Mac OS X
Ubuntu on Mac Mini PowerPC
The other day, I got an old Mac Mini PowerPC from 2005. And I decided to install Linux on it instead of using an old version of Mac OSX. Fun, ins’t it?
The first thing I did was to download the ISO image of the last version of Ubuntu and burn it on CD. But unfortunately, I discovered that the CD player wasn’t working anymore. 😐
I then tried to put Ubuntu on a USB key and boot on it. But it didn’t work either… This machine didn’t seem to be able to boot from a USB stick.
So how am I going to install Linux without a CD player and USB?
FireWire? Maybe, but I don’t have anything on FireWire.
The answer is netboot! 😀 Indeed, my last chance was to install it via netboot.
Here are the steps I followed:
- Install tftp on another Linux machine in your local network
- Configure tftp. Please find below the configuration file I used:
# # ftp://ftp.kernel.org/pub/software/network/tftp/ # service tftp { flags = REUSE socket_type = dgram protocol = udp instances = 30 wait = yes user = root server = /opt/sbin/in.tftpd server_args = -s /mnt/tftpboot cps = 100 2 log_on_success = HOST PID log_on_failure = HOST disable = no } - Put the Ubuntu files in the folder
/mnt/tftpboot(in my case). I copied the files of the last version of Ubuntu “Quantal”: http://ports.ubuntu.com/ubuntu-ports/dists/quantal/main/installer-powerpc/current/images/powerpc/netboot/ - Reboot the Mac Mini and enter the Open Firmware by holding “Option”+”Command”+”o”+”f”
- Type the following command to start the install:
boot enet:192.168.2.100,yaboot
With 192.168.2.100 the IP address of the machine where tftp is installed.
- Follow the Ubuntu installation steps and enjoy! 🙂
Redirect traffic to a specific network
This is a little trick which can be useful in some very specific case.
For example, you could have a machine with two network cards. One of the network is behind a proxy and the other one is connected directly to the internet.
You might want to forward all the traffic for google.com to the network which doesn’t have a proxy.
To do this, I am using the command route:
route add <hostname> <target network>
For example:
route add google.com 192.168.101.1
Note that this command is available on both Linux and Mac.
Samba access problem with Mac OS X 10.6+
This is a problem I encountered when I upgraded Mac OS X from the version 10.5 (Leopard) to 10.6 (Snow Leopard). One of my friend also got a similar problem when she upgraded to the version 10.7 (Lion).
This issue was affecting the access to the network shares set up with Samba (version 3.0.24) on my D-Link DNS-323. For some reason, I wasn’t able to authenticate on the shares as soon as I upgraded to Snow Leopard!
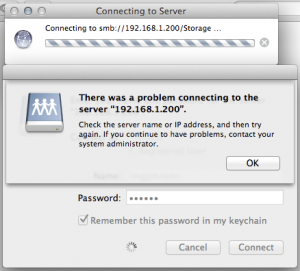
Here is the error message I was getting:

After browsing a few forums on the web, I finally found a solution. 🙂
I simply had to change the security mode in the Samba configuration file (smb.conf) to read:
security = USER
Note that this property can be found under the [global] section.
For more information about the Samba security mode, please read the following article by Jack Wallen:
Understanding Samba security modes

